The Toyota Prius+ / Prius V / Prius α (Model Code: XW40) is a hybrid compact MPV produced from 2012 to 2018, offering a spacious alternative to the traditional Prius with three-row seating and exceptional fuel efficiency. Designed for eco-conscious families, it combines Toyota’s Hybrid Synergy Drive with the practicality of a small minivan or wagon.
In this article, you will find fuse box diagrams for the Toyota Prius V, covering model years 2012, 2013, 2014, 2015, 2016, 2017, and 2018. These diagrams are crucial for identifying, locating, and understanding the function of each fuse and relay in the vehicle’s electrical system.
What’s Included:
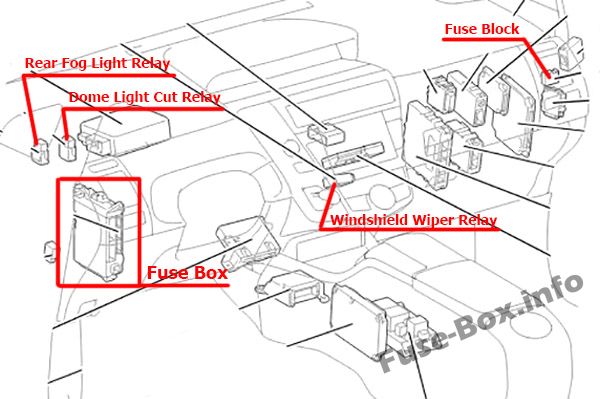
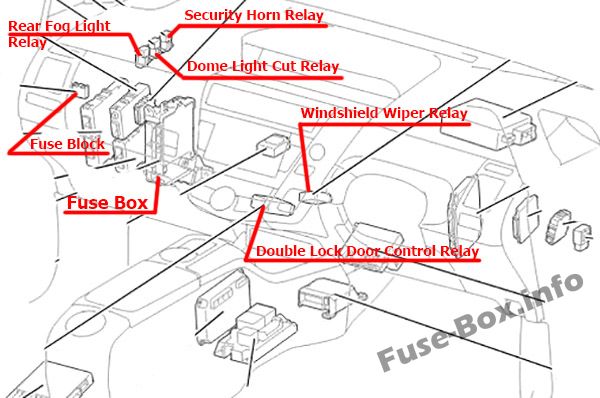
Fuse Box Diagrams – Clear and detailed layouts to help you identify the location and function of fuses and relays.
Fuse Panel Locations – Guidance on where to find the fuse boxes inside the vehicle.
Fuse Assignments – Descriptions of each fuse and relay to support diagnostics, maintenance, and repairs.
Whether you’re troubleshooting an electrical issue or replacing a blown fuse, this guide ensures that your Toyota Prius V (2012–2018) remains reliable, safe, and road-ready.
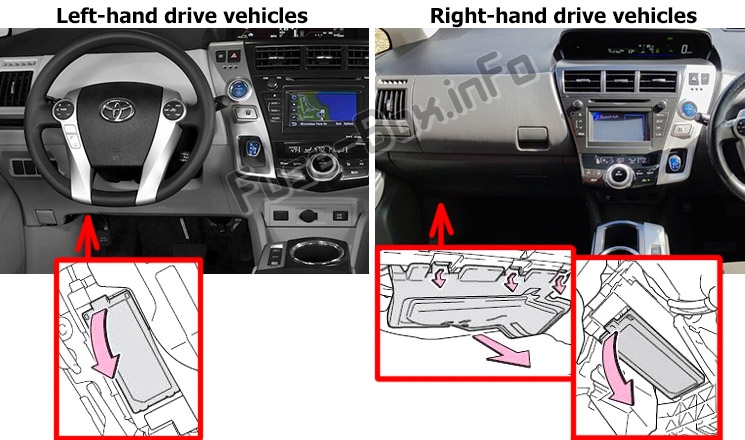
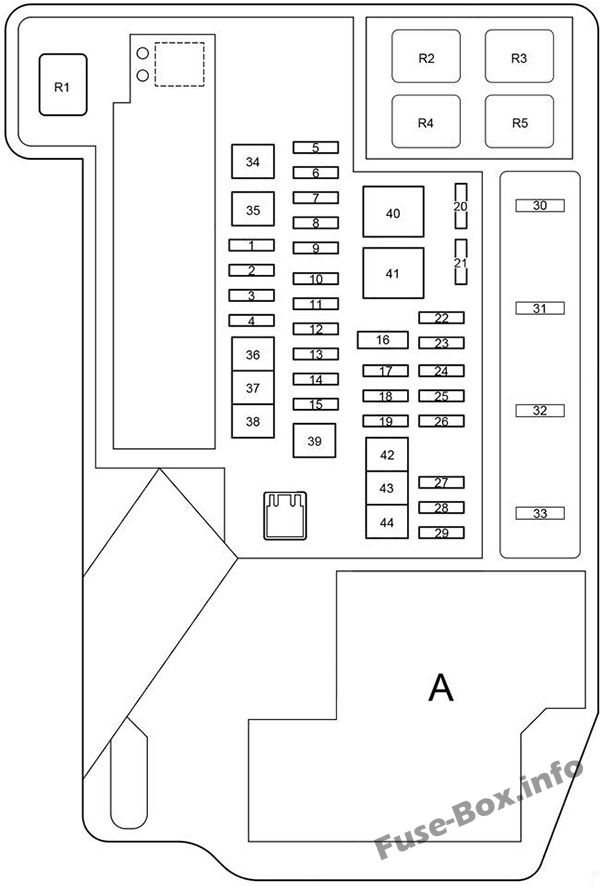
The fuse box is located under the instrument panel (left side), under the lid. Left-hand drive vehicles: open the lid. Right-hand drive vehicles: remove the cover and open the lid.
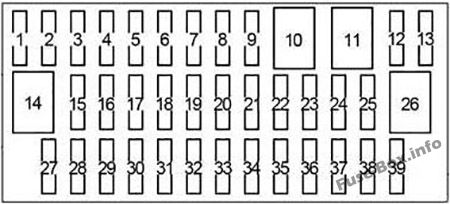
Fuse box diagram
Assignment of the fuses in the Passenger Compartment
№
Name
Amp
Circuit
1
CIG
15A
Power outlets
2
ECU-ACC
10A
Multiplex communication system, outside rear view mirrors, driver support system, audio system, navigation system
3
PWR OUTLET
15A
Power outlets
4
–
–
–
5
SEAT HTR FR
10A
Seat heater
6
–
–
–
7
SEAT HTR FL
10A
Seat heater
8
DOOR NO.1
25A
Power door lock system
9
–
–
–
10
PSB
30A
Pre-Collision System
11
PWR SEAT FR
30A
Power seat
12
DBL LOCK
25A
RHD: Double locking
13
FR FOG
15A
Before Nov. 2014: Front fog lights
13
FR FOG
7.5A
From Nov. 2014: Front fog lights
14
PWR SEAT FL
30A
Power seat
15
OBD
7.5A
On-board diagnosis system
16
–
–
–
17
RR FOG
7.5A
Rear fog lights
18
–
–
–
19
STOP
10A
Stop lights, high mounted stoplight, brake system, driver support system, vehicle proximity notification system
20
–
–
–
21
P FR DOOR
25A
Power windows
22
D FR DOOR
25A
Power windows
23
–
–
–
24
DOOR RR
25A
Power windows
25
DOOR RL
25A
Power windows
26
S/ROOF
30A
Panoramic roof shades
27
ECU-IG NO.1
10A
Electric cooling fans, multiplex communication system
28
ECU-IG NO.2
10A
Driver support system, Pre-Collision System, inside rear view mirror, garage door opener, yaw rate & G sensor, brake system, electric power steering, navigation system, panoramic roof shades, tire pressure warning system, seat belt pretensioners, audio system, emergency flashers, turn signal lights, windshield wipers, headlight cleaner
29
–
–
–
30
GAUGE
10A
Headlight leveling system, gauges and meters, emergency flashers
31
A/C
10A
Air conditioning system
32
WASHER
15A
Windshield washer
33
RR WIP
20A
Rear window wiper and washer
34
WIP
30A
Windshield wipers
35
–
–
–
36
MET
7.5A
Gauges and meters
37
IGN
10A
Brake system, driver support system, multiport fuel injection system/sequential multiport fuel injection system, SRS airbag system, occupant detection system (ECU and sensors), smart key system
38
PANEL
10A
Air conditioning system, emergency flashers, seat heaters, transmission, P position switch, navigation system, advanced parking guidance system, headlight cleaner, seat belt reminder light, headlight leveling system, glove box light, clock, audio system
39
TAIL
10A
Headlight leveling system, parking lights, tail lights, license plate lights, front fog lights, side marker lights
Which fuses control the cigar lighter and power outlet in the Toyota Prius V / Prius+ / Prius α?
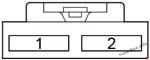
In the Toyota Prius V, Prius+, or Prius α, the interior cigar lighter and accessory power outlets are protected by two fuses located in the Instrument Panel Fuse Box:
Fuse #1 “CIG” – dedicated to the cigar lighter (cigarette socket). Fuse #3 “PWR OUTLET” – protects the 12 V auxiliary power outlet.
If the lighter or outlet stops working, inspect these fuses first and replace any blown fuse with the same amperage specified in your owner’s manual.